Managing a client’s expectations is not an easy task, especially if you are a designer. As much as you want to keep clients happy and live up to their expectations, things don’t always go according to plan.
While designers rely on their creativity to deliver great results, clients sometimes undervalue the effort or attempt to control the process. It’s a cycle that can make even the most ambitious projects crumble in a matter of seconds. This is why maintaining good rapport with clients is instrumental to a project’s success. Although there’s no one-size-fits-all solution, we have some ground rules that can help you manage client expectations and take your collaboration to a whole new level.
Related: Essential client onboarding checklist
1. Communicate your ideas clearly
Communication is an integral part of any successful project. To maintain good communication, keep it simple. Communicate your ideas without using professional terms or slang that your clients might not be familiar with or understand. Also, don’t depend only on words. Share examples and visuals to help clients conceptualize the goal you’re trying to achieve. This way, you set up clear ideas from the start—and leave less room for misinterpretation down the road.
2. Set clear boundaries
No matter how smoothly we try to meet a client’s expectations, there will always be a few bumps in the road. For example, after sending over your first mockup, clients will nearly always request changes. This is an expected part of successful collaboration. If, however, they continue asking for alternatives time and time again, this may lead to revising the entire design, extending deadlines and causing frustration on both sides.
While it’s perfectly normal to listen to your client’s feedback and answer their needs and requirements, falling into a never-ending cycle of revisions will not have a positive effect on the project—or your relationship. To avoid this scenario, set clear boundaries; be transparent about what you can achieve and how much time you can dedicate to revisions. Otherwise, the client might undervalue your knowledge and skills and eventually stop trusting you.
3. Define your communication channels
The easiest, most efficient way to nurture a client is to keep them regularly updated about your progress and any changes. However, thanks to the inbox overload we all face, communicating with your client via email may no longer be enough. Build trust with your client by letting them become an integral part of your project, follow its different stages, comment and give feedback. Here’s a comparison list of the best project management tools that give clients a clear view of what you’re working on.
4. Identify your key contacts
While keeping your client regularly updated is important, too many messages between your team and your client may lead to annoyance, confusion or burnout. To prevent this, select one point of contact between the client and the design team. This will streamline communication so it’s straightforward and easier to prevent any misunderstandings or conflicts from bubbling over.
5. State your payment terms
Whether you need more resources to complete a project or you’ve run into an obstacle that you must tackle before moving forward, there are many reasons to extend project deadlines. If this happens, it’s better to ask your client to pay in parts rather than the entire sum. This makes it easier to add late payments and fill any gaps before it’s too late. Make sure you state your payment terms clearly and as early as possible so it’s a win-win situation for you and your client.
6. Make it personal
Small gestures can do wonders. If you’re working with a client who’s willing to pay for your services and appreciates your work and time, you should nurture the relationship by going above and beyond. For example, send them a personalized thank you card. Whether you provide advice that might have a positive impact on the brand, invite them to a fun activity or take them out for lunch, it will encourage ongoing collaboration in the future.
7. Have a detailed contract
A clear and concise contract is a major prerequisite to successful communication and collaboration with a client. Your contract should cover the following items:
- Expected working hours
- Procedure for feedback & revisions
- Project milestones
- Budget & payment
Keep in mind that besides delivering a contract to your client, you must carefully review it with them to make sure they understand and agree to all the details.
The best projects are a result of clients and designers working together to achieve a common goal, and the expectations you set will influence how the project’s success is perceived. By following these 7 guidelines, you’ll create a respectful, collaborative environment that will encourage everyone to do great work together.
You’ve answered a request for proposal (RFP), attended a couple of pitches, and now you’ve landed that new client you worked so hard to convert. Congratulations! …Now what?
For any agency (and client), a new relationship can be a daunting prospect—especially when you’re in the early stages. But with a solid client onboarding process in place to kick-off your first campaign, you can easily bring them up-to-speed with your typical engagement.
Related: How to write a creative brief (with examples)
So, what exactly should your onboarding process look like?
In this post, we’ll show you a simple 8-step client onboarding checklist to help you kick things off on a positive note—and make sure every new campaign starts on the right foot.
Let’s dive in.
What is client onboarding, anyway?
Client onboarding is the process of welcoming a new client onboard to your agency.
Whether you’re selling a service like graphic design or marketing, or a product like a software subscription, onboarding is essential for ensuring the relationship runs smoothly from the beginning.
Think about it: You’re unlikely to be impressed with an agency if they don’t have a streamlined way to get your first campaign rolling, right?
Your clients feel the same way. They want an easy, stress-free way to start working together—not one that takes six weeks of back-and-forth before your agency begins delivering the work they’re paying for.
A solid onboarding process is an important part of your client retention strategy, too.
Selling other services and making additional revenue from existing clients is much easier than attracting new clients. In fact, according to Lobster Marketing, there can be an up-to-70% chance of selling to an existing customer, compared with as little as 5% for a new prospect.

Source: Lobster Marketing
Get your client onboarding process right, and you’ll improve the chances of having a long-term relationship with them.
However, get it wrong and you run the risk of losing the client before you have the chance to impress them with your work—leading to higher churn, and of course, lost potential revenue.
A successful client onboarding checklist
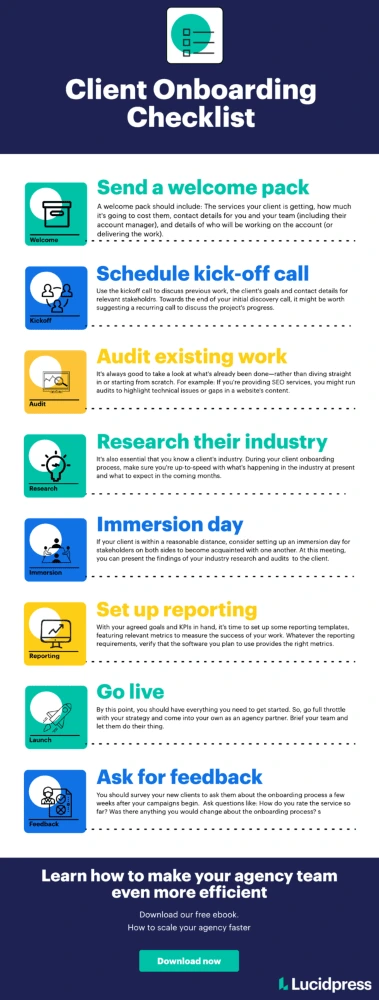
Now, you understand the importance of offering a great service to retain your clients, and you know that it starts from the very first day of working with a new customer. But how do you ensure the onboarding process goes smoothly?
Here are eight things you’ll need to do when bringing a new client onboard.
1. Send a welcome pack and questionnaire
Your client onboarding process starts as soon as they’ve signed your contract. So, send out a welcome pack and questionnaire to bring them fully up-to-speed with your way of working, and answer any questions they might have before your agency starts delivering the work.
A welcome pack should include:
- The services your client is getting
- How much it’s going to cost them
- Contact details for you and your team (including their account manager)
- Details of who will be working on the account (or delivering the work)
You might also wish to include some timescales and turnaround times for the services provided. This helps to set boundaries and confirms expectations between the two parties.
Send a questionnaire at the same time, which asks key questions that are relevant to the work you’ll be delivering. Some of the things you might need to know include:
- Their target audience, customer or demographic
- Their budgets for the year
- Who they consider to be their main competitors
- Any upcoming development roadmaps or business campaigns
The questionnaire responses can help you tailor your offering to meet the client’s needs—and make sure you’re focusing on things they’re expecting results from.
2. Schedule a discovery kick-off call
A kickoff call is a great way to get some one-on-one time with your new client.
Whether you’re picking up the phone or planning a Zoom meeting, use your discovery call to go through the client’s questionnaire responses and learn more about why they’ve chosen to use your services.
The kickoff call can also be a great opportunity to discuss:
- Previous work, and any issues that occurred. (This might include asking what a previous agency did and whether there was anything the client didn’t like, so you can avoid similar roadblocks.)
- Your client’s goals and any KPIs you’ll use to report on your activity.
- Access to your client’s website, content management system, and Google Analytics or Ads accounts to prevent permissions from slowing down your first campaign.
- Contact details for relevant stakeholders on the client side, so you can get in touch with the right person at the right time.
Towards the end of your initial discovery call, it might be worth suggesting a recurring call—perhaps on a weekly or fortnightly basis—to discuss the project’s progress.
This is especially important in the onboarding stage, as you and the client get to know each other better. You want to prove you’re reputable, trustworthy and doing a good job, right?
3. Audit their existing activity
We know the feeling of being so excited to work with a new client that you’re itching to get started. But whether you’re delivering marketing or design services, it’s always good to take a look at what’s already been done—rather than diving straight in or starting from scratch.
You can get some great ideas on how to boost results, and identify potential strengths or weaknesses, just by doing just a little digging.
For example: If you’re providing SEO services, you might run audits to highlight technical issues or gaps in a website’s content.
If you’re delivering a social media campaign, however, browse their Twitter profile to see whether they’ve already got the foundations of a strong presence and just need a little tweaking to see an influx of results.
It’s a fantastic way to tailor your strategy to each client and search for low-hanging fruit that could deliver short-term results.
4. Research their industry
Sure, it helps to understand the products or services your client sells. But, it’s also essential that you know a client’s industry.
During your client onboarding process, make sure you’re up-to-speed with what’s happening in the industry at present and what to expect in the coming months.
Not only can this help you predict and plan around potential issues, you’ll also know what you’re competing with—and the tactics you’ll need to use to make their company stand out.
You can research a client’s industry by:
- Using social listening tools (such as Mention) to understand trending topics.
- Searching the topic in Buzzsumo and identifying industry influencers who may be helpful as part of a marketing campaign.
- Investigating what their competitors are doing with their SEO, content marketing and PPC activity using Ahrefs.
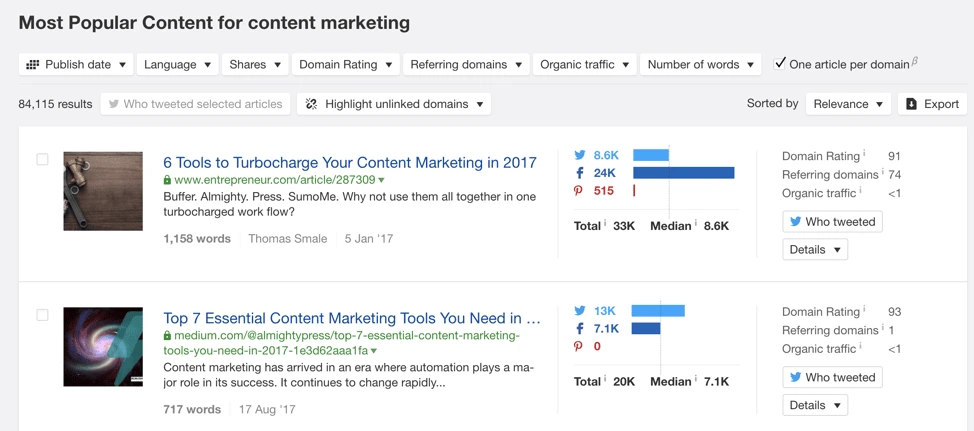
Source: Ahrefs
Prove to them you’re committed and eager to learn more about their industry—particularly if you haven’t worked with similar clients before.
5. Hold an immersion day
Granted, online calls are good if your client is on the other side of the world—but nothing can beat face-to-face meetings for getting to know people.
If your client is within a reasonable distance, consider setting up an immersion day for stakeholders on both sides to become acquainted with one another.
Take members of your team who will be working on the account. This will help them to get a feel for your client and their business—and more importantly, the boundaries your proposed strategy needs to fall within.
At this meeting, you can present the findings of your industry research and audits, as well as discuss next steps with the client. You could even take along some examples of your agency’s previous work or campaigns to show the client—especially if you’re unsure whether they’ll agree to out-of-the-box marketing ideas.
The immersion day is also a fantastic opportunity to get hold of essential documents you might need to deliver your work. This could include brand documentation such as:
- Buyer personas
- Brand guidelines
- House copywriting style guides
- Tone-of-voice documents
Remember: You’re trying to make a good impression. Don’t be afraid to go the extra mile if you’re hosting. Make it comfortable for your new client and reaffirm in their mind that they’ve chosen the best agency.
6. Set up reporting templates & tools
Following your discovery call and immersion meeting, you should now have a good idea of what your client wants to achieve.
With your agreed goals and KPIs in hand, it’s time to set up some reporting templates, featuring relevant metrics to measure the success of your work.
Let’s say you’re providing paid media services, for example. If your client’s goal is to reduce media spend and boost revenue, you’ll want to look at metrics like cost-per-click, revenue and ROI, and find a software that can report on all three.
For an SEO client, on the other hand, you’ll likely be monitoring keyword rankings and organic search traffic—which requires totally different software.
Whatever the reporting requirements, verify that the software you plan to use provides the right metrics, and that your in-house templates (where you’ll provide data from the software) are suitable for the client and tailored to their needs.
7. Go live!
Now that the majority of your client onboarding checklist has been checked off, let’s move on to the exciting part: launching your first campaign.
By this point, you should have everything you need to get started. So, go full throttle with your strategy and come into your own as an agency partner. Brief your team and let them do their thing.
During these first few weeks, make a conscious effort to double-check any deliverables to ensure they’re on point. Regular follow-up calls are a great way to keep everything on track and make sure everyone is on the same page.
Communication is key. You want to make a good impression early on, so it’s essential that you get it right—and that you’re open to feedback if the client has any suggestions.
8. Ask for feedback
After the initial onboarding stage has passed and you’re delivering work for the client, it can be tempting to focus only on the future. But, it’s important to take stock for a moment.
You should survey your new clients to ask them about the onboarding process a few weeks after your campaigns begin. It doesn’t have to be a long survey—remember, your client is probably ultra-busy.
But, you can ask some key questions to identify your strengths and areas for improvement, such as:
- How do you rate the service so far?
- Was there anything you would change about the onboarding process?
- Would you recommend our services or products?
Sending out a simple survey is a great opportunity for you to get feedback on your practices and adapt your onboarding plan for future clients to make it even more seamless next time.
Add a reminder to your client onboarding to-do list to make sure you don’t forget to ask for feedback. It’s likely that your current clients can suggest improvements to your onboarding process, which could help you convert new leads. Don’t shrug it off.
Key takeaway
Winning a new client is an exciting thing—and it should always be celebrated. But, you don’t want all the hard work that went into getting them onboard to be wasted.
A streamlined and sensible approach to onboarding new clients will help you deliver a great service, and it delight your customers at a crucial stage of your working relationship. Put these guidelines into practice to see the difference it makes first-hand.
Looking for ways to make your team even more efficient and grow your agency brand? Check out our free ebook: How to scale your agency faster
The more appealing a proposal is, the more likely you’ll be to win the job. Seems simple enough, doesn’t it?
But, creating proposals that are professional, detailed, attractive and on-brand isn’t easy. Especially when you’re trying to do it quickly.
Related: How to create engaging assets for your sales team
The good news is that proposal management software can help you speed up and improve the process.
In this post, we’re going to look at 5 tools that can help you, as well as explore the benefits and key features of proposal software.
The benefits of proposal management software
Central location
Store everything in one central, cloud-based location and access it from anywhere you get online. Assign access to multiple team members as necessary and collaborate in real time.
Act quickly
With templates and automation, creating proposals is much faster. Generate pitches, proposals and presentations quickly and simply, and make the most of opportunities as they happen.
Streamline the entire process
When you can create, collaborate on, approve and distribute your proposals in one neat system, it removes the need for complicated processes that use multiple pieces of software.
Notable features of proposal management software
Searching for proposal management software can be overwhelming. There are so many options on the market, each with varying features.
To help you make the right choice, consider the 4 elements below and decide which would be most beneficial for your situation.
1. Branded templates & pre-filled forms
Proposal creation takes time, but with ready-made templates and automation that allows you to pre-fill forms, the sales process will move much faster.
Even the most basic proposal automation software should carry this feature, but it’s the extras—like being able to brand and fully customize the templates—that will give you that professional edge.
2. Mobile-ready
If your sales team spends a lot of time in the field, proposal generator software that works on mobile devices could quickly put you ahead.
When a sales rep can input key information while on the road, at a meeting or on-site, a professional proposal can be turned around in days rather than weeks.
Also, being able to give on-the-spot estimates straight from a handheld device means the conversation can progress more quickly. If this is important to you, you might want to consider software that can integrate with or replace your CPQ (computer pricing quote software).
3. Customer relationship management
From the minute an RFP starts to form, a CRM process should be initiated for tracking purposes. The better your sales team is at nurturing leads and following up after proposals have been sent, the higher your chances of success.
Proposal automation software that comes with CRM features will empower your sales team to make the most of every opportunity.
4. Smart reporting
Where time and money are being put into drawing up proposals, the return on investment should be measured. The better you get at analyzing the data, the more refinements you’ll be able to make to your sales process.
Some proposal automation software will come with built-in reporting tools, though this could just as easily be managed with a spreadsheet. Software might offer an expanse of reports, but it needs to be easy to learn. If it’s overly complicated, it won’t be as effective as it could be.
5 proposal automation & management tools
To find the right proposal generation software for you, you’ll need to weigh up your requirements against the features on offer.
Consider the 4 elements we’ve listed above as well as any other functionality you’re looking for. Do any of the following proposal management tools seem to offer the ideal solution?
1. Bidsketch

Bidsketch allows you to make customized proposals using saved sections that can be combined to build a full document.
Features include:
- Templates & reusable content
- Optional fees (for upselling additional services)
- Client landing pages
- Automation & workflows
- Electronic signatures
- Analytics
2. Nusii

Proposal management software Nusii lets you personalize templates and track the proposal process.
Features include:
- Proposal notifications
- Unique branding, domain & email
- Reusable content
- Reporting
3. RFPIO

Compared with the proposal management tools we’ve looked at so far, RFPIO is more advanced. It’s likely to be a better fit for larger organizations with a lot of activity.
Features include:
- Import & export data
- Answer library
- Intake forms
- Project management
- Collaboration & commenting
- Recommendation engine
- Integrations
4. PandaDoc

PandaDoc handles proposals, quotes and contracts. It also integrates with popular CRMs like HubSpot and Salesforce.
Features include:
- Templates
- Content library
- Brand customization
- Electronic signatures
- Pricing tables
- Collaboration & commenting
5. Lucidpress

Lucidpress is a brand templating platform for businesses that want to align sales & marketing and manage brand consistency, while also empowering their people to customize materials quickly.
Its features include:
- Fully customizable proposal templates
- The ability to lock elements within a template (e.g. fonts, colors, logos)
- Smart fields for pre-filling data like names & contact details
- Automatic data population
- A central storage location
- Real-time collaboration
- Instant digital sharing
- In-app printing & mailing
Using Lucidpress to create on-brand proposals
Of course, we have a favorite. With Lucidpress, it’s easy to create quick proposals that are on-brand.
Put another way, Lucidpress is a design platform with brand management capabilities. It’s a tool for designing sales & marketing materials, with plenty of additional features that make brand consistency achievable.
The benefits of Lucidpress include:
- One central storage system that’s cloud-based, meaning it can be accessed from anywhere.
- An intuitive design tool where templates can be created from scratch or imported from InDesign.
- Templates where key elements (such as logos, brandmarks & crucial text) are locked in.
- Document automation, to save time on tedious tasks like importing data or filling out frequently used information.
- Customization options that allow team members to personalize templates as needed.
- Easy distribution via instant online sharing or an in-app printing & shipping service.
How to create proposals in Lucidpress
To give Lucidpress a try for creating and automating proposal generation, follow the short guide below.
1. Design the template
Build a template from scratch (or import from InDesign) using the intuitive drag-and-drop design tool. Customize it completely to mirror other assets and keep your proposals on brand.
(Not sure where to start? Check out our library of proposal templates for inspiration.)
2. Add smart fields
Reduce admin time with smart fields in Lucidpress. Use them to auto-populate your proposal template with things like names, email addresses and contact details.
When a sales representative begins to customize your template, it’ll auto-fill with their details.
3. Lock brand elements
Before you make your template available to others, though, you should lock in the crucial elements.
Fix logos, brand names, and essential elements in place to maintain control over the brand and the way the document is structured.
4. Empower your team to customize
Next, make the template available to colleagues. Give them access to the central document store in Lucidpress.
Teach them how to customize the template so they can generate professional, on-brand proposals in minutes.
5. Distribute to potential clients
Use Lucidpress to share proposals instantly online, or to order & deliver printed versions. It offers a number of digital and print-ready file formats, so you can share documents with anyone anywhere.
Key takeaways
The primary benefits of proposal automation software include:
- central storage
- a streamlined process
- the ability to work faster
There are hundreds of proposal automation tools on the market. Before you invest, you need to understand which features are most important to you.
Lucidpress can help you protect your brand and align sales & marketing content. With lockable proposal templates that are stored centrally and easily customized by sales reps, you can streamline and speed up your proposal process.
Every sales manager knows how difficult responding to an RFP can be. From wrangling subject matter experts to formatting your responses, getting everything together without an efficient process feels like a race against the clock.
Related: How to respond to an RFP (request for proposal)
The pressure is enough to make you think about abandoning the proposal altogether. But before you give up, there is a way to help things go smoothly without pulling your hair out. RFP software helps you manage the process without having to start from scratch with each new request that comes in.
Benefits of RFP software
When it comes to responding to requests, time is of the essence and automation is key. [![]() ] A good RFP tool helps you build a knowledge base of past responses and assign questions to staff for review.
] A good RFP tool helps you build a knowledge base of past responses and assign questions to staff for review.
The best RFP software:
- Saves time in generating answers to common questions. Since your company is likely to work on several similar proposals, you’ll be able to reuse past responses.
- Keeps you organized. No more merging multiple documents, copying and pasting from emails, or having to transcribe verbal answers. Responses are saved in a common library where you can tag and organize them in a way that makes sense.
- Accommodates multiple users. Your RFP response is a team effort. You’ll likely have multiple contributors, as well as reviewers who need to approve things before submission. Being able to collaborate seamlessly in the software is critical.
- Makes it easy to update outdated content. The right RFP tool shows you how old your answers are, so you can update responses as needed to keep content fresh. Some software gives you the ability to create review cycles so you don’t have to think about how often to update information.
Tips for a successful RFP
Even the best RFP management software won’t fix a broken proposal process on its own.
If you’re looking to improve the procurement process, here are some tips on how to make your next RFP a success.
1. Have a kickoff call
Start the process with a call that includes all members involved in the procurement process. This includes SMEs, reviewers, and marketing team members formatting the final proposal.
2. Set clear expectations
Make sure everyone knows what their role is and how to do their job. This includes training new members on RFP software.
3. Stick to the plan
Don’t overcomplicate things by straying off-course. Every member has a job to do, and they need to be willing to follow the same process and timeline as everyone else.
4. Create internal deadlines ahead of the RFP closing date
Plan for the unexpected. Internal deadlines should be far ahead of the final due date. This way, problems can be addressed before submission.
5 Best RFP Softwares to Choose From
1. PandaDoc
Rating: 4 stars and above
PandaDoc offers RFP generation software and eSign technology. The RFP software offers reusable proposal templates, customizable design elements and custom pricing tables. The software also integrates with Hubspot, Salesforce, PayPal and Insightly.
2. Qwilr
Rating: 4 stars and above
Qwilr RFP software offers design blocks with text, videos and other embeddable features that can be saved and reused in every proposal. The software also includes interactive pricing, so prospects can learn about additional line-items and upsells related to their initial proposal. Teams can use real-time collaboration features to coordinate on a proposal, and the software offers several integrations and security features.
3. Proposify
Rating: 4 stars and above
Proposify offers templates, e-signature capabilities and a content library with case studies, product descriptions, images and bios. It also offers interactive quoting capabilities and analytics metrics on which proposals were viewed and when.
4. ClientPoint
Rating: 4 stars and above
ClientPoint also offers templates and a master content library to quickly pull RFPs together. It integrates with Salesforce, HubSpot, ZOHO and other CRM tools. A live dashboard tracks whether proposals have been sent, viewed or signed. Analytics data shows how long a prospect viewed a document and if they shared or downloaded it.
5. Lucidpress
Rating: 4 stars and above
Lucidpress is a brand templating platform that makes it easy for sales teams to quickly create on-brand proposals. The software offers pre-designed templates, a brand asset library with saved colors, fonts, logos and images and you can quickly auto-populate information with data automation features.
Creating on-brand proposals for your RFP
While RFP software is great at orchestrating the process and saving time, one thing it may not be so great at is creating branded proposals that match other company documents.
Your marketing team invests a considerable amount of time into building your brand. Instead of creating a generic proposal using templates provided by your RFP software, tap into their creative genius and use a branded proposal instead.
Lucidpress makes it easy to create beautifully branded proposals, and getting started is easy. You can design a new template from scratch, choose one from the template library, or import an existing file from InDesign.
Next, add smart fields to your document. These dynamic fields auto-populate information (like name, job title and contact details) to save proposal creators time.
Once you have all static elements and smart fields in place, lock down the parts of your proposal that don’t change (e.g. brand logo, fonts and colors). This keeps editors from accidentally changing information that is essential to your brand identity.
After document setup is complete, save your template so others can use it.
Proposal editors can now access the files they need and share proposals directly with the client when complete.
Key takeaways
Creating RFPs is hard work. Using RFP management software streamlines response time by providing a knowledge base to reuse winning answers and empowering team members to collaborate in real-time.
Once you have your responses in order, ditch the cookie-cutter files provided by your RFP software and create beautiful, on-brand proposals with Lucidpress.
Want to get a head start on your next RFP? Take a look at these sales proposal templates.
Creative briefs are a lot like lighthouses: they provide essential guidance and direction for creatives working on large and small projects alike. Without a beacon, it’s easy for your project to get moored or lost at sea — think Castaway but at your job. And no Tom Hanks or Wilson by your side for company or relief.
Related: Essential client onboarding checklist for agencies in 2019
You want your creative briefs to be both concise and thorough. A good creative brief goes a long way. It helps maintain efficiency across teams and ensures individual contributors feel supported, happy and appreciated. But it also takes time. To help you maintain steam and produce creative briefs that (ahem) get the job done, we compiled a shortlist of questions to consider as you write:
- What is the end goal of my project?
- Are there templates I can use to fill out the creative brief and reduce the time spent on this task?
- Which departments should be involved in this project?
Answering these questions provides you with the clarity and structure needed to fully flesh out your creative need. So whether you need a one-page press release or a 15-page ebook, you can trust your brief to communicate your project’s scope effectively.
Now, let’s cover some basics.
What is a creative brief?
A creative brief is a detailed summary of a creative project.
Typically a brief is filled out by whoever is making the request. At a baseline, it needs to include The Basics:
- A project summary is a brief synopsis of the project.
- Some background context (such as data, products, or research articles) helps the creative team better understand your project goals.
- Your objectives, otherwise known as project goals, shed light on the project’s long-term (and short-term) strategy.
- Timeline(s) and a list of expected deliverables provide the creative team with a clearer picture of how and when they can take on your project.
- Include a list of the key stakeholders or people the creative team should contact when questions pop up.
- The target audience tells the creative team who they should be speaking towards throughout the campaign (so to speak).
- Brand guidelines or rules, like voice, tone, and style preferences, are crucial details for creatives to know. Including these notes in your creative brief helps eliminate time spent on revisions.
- Including a project budget is optional. However, if there’s any chance of sending it to freelance, be sure to include one.
That said, different types of briefs have different kinds of requirements — but don’t worry about that right now, we’ll touch more on that shortly.
What are the benefits of a creative brief?
Two parties benefit the most from creative briefs: the requesting party and the creative team.
- For the creative team, creative briefs help people like designers or copywriters do their jobs better and more efficiently. Not only that, it helps them craft great content that your audience will love.
- For the requesting party, a creative brief helps you understand the strategy and goals behind your project. It also helps to ensure that the work you get back is aligned with your vision for the campaign.
For example, say a sales agent needs a unique one-pager for an event they’re planning to attend in a month. That sales agent would fill out a creative brief and then send it to the creative team. From there, the creative team can slot the project into their production queue, quickly fill the request using a pre-templatized format, or temporarily backlog it depending on their workflow.
Now that we’ve covered the basics, let’s dive into how to write a creative brief for copy, design, and PR departments.
What are the main types of creative briefs?
Creative briefs are built to cover a broad spectrum of project needs. We’ve identified three different types of briefs:
- Copy — Anything word-related.
- Design — Anything visual-related.
- PR — Anything newsworthy that’s public-facing.
What do I need to include in a creative brief?
A copy brief is going to be a little bit different than a design or PR brief. No matter what, you’ll want to cover your bases thoroughly. We recommend using a pre-formatted brief template to make your life easier. (You can mark the fields N/A if they don’t apply to your project.) And keep in mind all creative briefs need to include The Basics — plus a few extra tidbits.
But, how do you know what information goes into what brief? We’ve outlined what you’ll need to include in 3 different types of briefs (copy, design, and PR) to help you get the ball rolling.
Copy brief
- The Basics
- Project summary
- Background context
- Objective
- Timeline(s) and deliverables
- Key stakeholders
- Target audience
- Guidelines
- Budget (optional)
- Word count — This helps the writer gain a clearer understanding of how much time it will take to complete the project. Additionally, some social media platforms have word count restrictions so you’ll want to make sure the writer is aware of these ahead of time.
- SEO keyword list — SEO keywords help boost your content’s ranking in search engine optimization results. Most demand generation copy projects include one.
- Examples — Content examples can help guide the writer if you’re looking to produce a specific type of content.
Design brief
- The Basics
- Project summary
- Background context
- Objective
- Timeline(s) and deliverables
- Key stakeholders
- Target audience
- Guidelines
- Budget (optional)
- Distribution — Where you’re planning on placing this visual asset matters. Are you posting the visual asset to social media, on the company blog, or distributing it to your customers?
- Deliverables and size requirements — Designers need to know these details ahead of time. Including this information prevents designers from sizing something incorrectly or creating a digital asset instead of a hands-on one.
PR brief
- The Basics
- Project summary
- Background context
- Objective
- Timeline(s) and deliverables
- Key stakeholders
- Target audience
- Guidelines
- Budget (optional)
- Publication — Location, location, location! Where you publish PR content matters, so be sure to include where you’re planning on having the content live.
- Word count — Most PR efforts are copy-heavy. And some publications have word count requirements, so you want to make sure the writer is aware of project expectations. You can include the word count in the “deliverables” section of the content if you’d prefer.
Examples of creative briefs
In case you wanted a frame of reference before you get started (visual learning style, anyone?), we’ve included some modified creative brief examples from our template gallery.
Copy brief
Modified from our Simple project proposal template
Design brief
Modified from our General project proposal template
PR brief
Created in Lucidpress
In brief
At the end of the day, creative briefs bridge the gap between good ideas and polished projects. They empower creative teams to stay on-task, on-time, and on-brand. And with the help of a pre-formatted creative brief template, you can quickly and easily insert information, send and process requests, and do more as a team. After all, who doesn’t want to save time and energy — while getting more done as a company?
Okay, so, now that you’ve been briefed on how to write a creative brief, it’s time to let your colors fly. Show us your briefs!
Download a free creative brief template to get started
Whether you’re new to project management entirely or you’re an experienced project manager with a whole range of projects under your belt, having the right tools to get your job done is essential. Today’s technology stack offers a deep selection of project management software, from scheduling to document management.
Related: 8 best team collaboration tools for your marketing team
Project management tools help everything run smoothly, keeping your team together in lockstep and empowering you with a bird’s eye view to monitor how each project is going. It’s especially important to have smart project management tools if your team is juggling several projects at the same time – like most of us do these days.
Some project management tools help you plan & report on a project from end to end, while others streamline specific parts of the process boosting your productivity. Because there’s so much choice out there, it pays to sit down first and think through why your team needs project management – and how much management is needed.
What is project management & why is it important?
Project management is essentially the business process of planning, executing & completing a project using a team’s documented workflows, tracking, skills & knowledge.
A good project manager has to wisely allocate the resources (e.g. people, money, time) available to them to get projects completed to the right standard. It’s their primary job to plan & track progress on the team’s projects in order to meet the goals they set.
Project management is valuable across a broad range of industries. The biggest challenges are usually to finish on time and within budget, while still meeting the project’s goals.
Agencies, partners & clients all need to do project management well to be efficient and successful over the long term. It ensures that when the final project is delivered, it provides value for the business and meets any strategic goals that have been put in place. A project conducted without good management in place runs the risk of devolving into chaos, with no clear responsibilities or expectations to inform or guide the team – not to mention clients.
To some, project management might seem like an unnecessary expense or even a waste of time, but it’s proven to actually save both time & money. Good project management gets everyone on the same page so the team can move together and deliver high-quality work they all feel proud of.
The 7 best project management tools
There are so many different software platforms that can be helpful for project managers & the teams they serve. If you want to manage your projects more efficiently, you can select a suite of tools from the same vendor or combine tools that work well together for different parts of the process. Here are some of the tools we recommend for excellent project management.

Asana
Asana is a great one to start with if you’re looking for a comprehensive project management tool. Created by the co-founder of Facebook, this tool takes care of all of your project management needs. It helps you schedule & assign tasks so that everyone knows what they need to do (and when) to achieve success for the project.
Asana lets teams create individual workspaces, which can then be used to manage various projects & tasks. You can track individual tasks and notify followers of any changes or updates, as well as make sure that each task has a next step. If you’re looking for a tool that helps you to track everything in one place, Asana is an excellent choice that makes it straightforward.

Casual
For those who like to visualize the projects they’re managing, Casual offers a simple online tool for visualizing workflows. Even those who don’t have a project management background can find this tool useful. You might also choose it simply because you’re a visual thinker (wink) and want to see everything about your project laid out before you.
The easy-to-use interface is intuitive, so there’s no steep learning curve when you start using it. You can create new tasks, put them into different categories, and create new branches for your visual map. The tool is simple but still lets you assign & track tasks, as well as integrate it with a variety of other tools.

Lucidpress
When you’re looking for project management software, don’t forget to consider the tools you can use for specific types of projects or certain parts of a project. If you’re involved with generating or customizing branded marketing materials, having an intelligent design tool that helps your team create & collaborate on projects is essential.
Lucidpress makes it easy to manage design & publishing for your brand, and it incorporates features that are perfect for project managers. For example, turning on Document Approval requires all documents to be reviewed & approved before they can be published or shared. This empowers team leaders to retain control over document quality while team members get on with the next tasks assigned to them.

Trello
Trello is another option for those who crave a visual interface to manage their projects. With Trello, you create different boards for your projects, with cards that you can group into columns.
The tool itself is super customizable. The columns can be labelled any way you want – many of them start off with generic labels such as To Do, In Progress and Done. You might have task lists for research, ideas or anything else you want to organize, keep track of and move around.
Each card represents a task and can be assigned to members of your team. They can also hold deadlines, notes, and even attached files so that team members have immediate access to everything they’ll need to get their work done.

Slack
While Slack isn’t a project management tool in and of itself, it is a tool that can contribute nicely to your project management software stack. In Slack, you create different channels for various purposes, so you can keep conversations about different topics as focused as possible.
Slack can foster better collaboration and provide better oversight. It can speed up communication and file-sharing, and it integrates with a range of project management tools like Asana and G Suite. Since it’s primarily a communication tool, we don’t recommend depending entirely on Slack to manage complex projects, but it can certainly be a valuable aid.

Basecamp
Basecamp was an early offering for project management tools, and it’s been used by large enterprise companies since it was first released.
Basecamp lets you split up your view of projects, so you can zoom in or out to see as much (or as little) as you want to. You can look at an HQ view, which provides a broad overview of your teams & projects, or you can dive into specific ones to get a closer look.
Using Basecamp, you can create to-do lists, assign tasks to one or more people, store notes & files and add comments. Message boards are also available to make project-based communication easier to conduct & reference later.

Dropbox Paper
Dropbox Paper initially began as an in-house tool for Dropbox. Unsurprisingly, considering it was built for a file-sharing company, the tool helps you to keep documents, files & images in one convenient place. It gives you the features you need to organize & prioritize tasks and keep projects on track. It also provides real-time reporting on the work your team is doing.
Dropbox Paper integrates with a few other tools you might use for project management, too, such as Slack & Trello. The built-in task management feature makes it easy to assign people & deadlines to specific tasks, ensuring the right people get their eyes on the right tasks at the right time.
Key takeaway
If you’re looking for the best project management tools, you have a deep bench of alternatives to help your team complete all its projects to a high standard. Consider what you really need from a project management tool before evaluating your available options and making a choice.
Ready to take your team’s project management skills to the next level? Try Lucidpress free or schedule a demo today.
Responding to a request for proposal (RFP) is a bit like playing the lottery. Winning could transform your business… but what are the odds, right?
Well, okay—they’re probably not as low as your chances of hitting the Powerball jackpot. But with the average RFP win rate at less than 5%, they’re not exactly rosy. To put things in perspective, for every 20 RFP responses you send, you only have a chance of winning one.
But that doesn’t mean you can’t beat the odds. In this guide, we’ll go over the art of creating a winning RFP response, and offer some rfp response template examples to help you on your way.
First things first:
1. Decide whether you should respond to the RFP
It takes an average of 20 to 40 hours to craft an RFP response. So while you might be raring to go, it’s worth thinking about whether you should actually invest the time and effort.
Here are a few things to consider:
- Is the project a good fit?
- Have you successfully tackled similar projects in the past?
- Do you know enough about the industry and the prospect’s needs and goals?
- Is the issuer even in your target market?
- Do you have a reasonable deadline to build your rfp response?
If the answer to one of more of these is ‘no’, it might not be worth using your time and resources to respond.
2. Assemble your team
A winning rfp response is a team effort. So, once you decide to move forward, you need to put the right group of people on it.
Jason Jordan recommends having an RFP “SWAT team”—a team permanently assigned to RFP responses. This allows you to work on proposals without over-stretching your resources.
The first part of assembling your RFP go-team?
Assign someone to take ownership of all rfp responses
Whether this is you or someone else on your team, the rfp response leader should own every step of the process, including:
- Coordinating between different departments
- Making sure the proposal is cohesive and consistent in both design and wording
- Building a library of answers and supporting materials.
- Documenting every step of your team’s process for future reference
After you decide on a RFP leader, they can then delegate and build out their team of designers, writers, and sales contacts.
Next, a few tips on saving your new team time:
3. Consider drafting pre-prepared elements
The less time you spend figuring out what to say, the more time you can spend fine-tuning your proposal and getting it just right.
For your RFP introduction in particular, you might want to have some pre-prepared answers ready. For example:
- A brief history of your company, including the organizational structure, company size and the areas you serve
- Key people, their background, expertise and experience, and their contact details
- Success stories—how have you helped other clients reach their goals? (Bonus points for clients in the same industry as the RFP issuer or that sell similar products or services.)
- Your approach and methodology, including how you test and validate results
- Pricing, policies and other terms and conditions
- If applicable, details of your handover process.
4. Make sure you understand the ask
The key to nailing a proposal is to understand what the RFP issuer wants and to give them just that. No more, no less.
Costs aside, your proposal should detail:
- What you’re hoping to accomplish
- A step-by-step breakdown of how you intend to meet the client’s goals
- A timeline, with milestones
- Key deliverables
Try to be as detailed as possible, but don’t ramble. Your answers should be comprehensive and specific, yet concise and to-the-point. Think short, snappy sentences and plain language.
Not clear about some aspect of the RFP? Drop the issuer an email. This will show them how committed you are to getting it right.
Here’s what you could tell them:
Hi [NAME],
Thanks for the detailed and comprehensive RFP outline.
We’re currently reviewing the RFP, and we’re pleased to say your requirements are aligning well with what we offer. That said, we do have a few comments and questions and would like to schedule a [30 minute / 1 hour] session with you to make sure we’ve covered all the bases.
Would your team be available on [Insert specific date and time]? Please confirm and I’ll send over a calendar invite.
Thanks and speak soon,
[NAME]
5. Structure matters
There’s no need to start from scratch every single time. Working from an RFP proposal template can save your team valuable time and headaches. At Marq, we have plenty of free proposal templates to get you started.
That said, you should always tweak your RFP template and think carefully about how to structure it.
The RFP issuer will probably set out their requirements in order of priority. So, if the RFP starts with the specifications and moves on to price, don’t start your proposal with price. Address the specifications first. This makes it easier for the issuer to check your proposal off against their priorities and shows them you have a deep understanding of their needs.
Remember it’s about the client, not you
When you write a proposal, your job isn’t to talk about yourself. It’s to show you can deliver what the RFP issuer wants. Every single point should relate to the ask.
Let’s say the issuer, an architectural design studio in Charleston, is looking to improve their social media metrics.
The first RFP response says:
We have extensive experience running successful social media campaigns in Charleston, South Carolina. We excel at boosting impressions through targeted outreach campaigns.
As an architectural design studio, it’s unlikely that they understand the finer details of social media marketing. They’re probably scratching their heads, wondering what the heck impressions are.
Contrast this with the second RFP response:
We’ve worked with several architectural design studios in the Charleston area, including [Company A], [Company B] and [Company C]. Our aim is to raise awareness of your brand and increase likes, comments & shares by:
- Creating relevant content targeted at your ideal customer
- Posting company-related updates
- Running promotions
- Monitoring analytics to measure response and revise our approach as necessary
Now, that’s more like it, isn’t it? The response showcases the company’s expertise by name-dropping three past clients. It outlines exactly how they aim to meet the RFP requirements in plain English.
More to the point, don’t try to impress by attempting to “improve” on what the RFP is asking for or going in a different direction. Around half of RFP responses get kicked out for non-compliance. Don’t be one of them.
Key takeaway
Bottom line? It pays to be strategic if you want to nail your RFP response and maximize your chances of winning the bid.
A strong proposal persuades the client you’re best-placed to help them overcome their challenges and achieve their goals. Once you decide to respond to an RFP, listen hard, communicate clearly and—most importantly—put the client front & center in your proposal.
Want to get a head start on your next RFP? Take a look at these sales proposal templates.
Preface: Welcome to the race—Quantity & quality of content
We work in a race. A design race.
At the root of that race lies the simple fact that the design process has fundamentally changed.
It used to look like this:

But now it looks like this:

Instead of a simple process where a single person requests a limited amount of content, many people now create marketing & sales materials on behalf of your company. Vendors, salespeople, partners and employees are all creating content across a variety of channels for an increasingly fragmented audience.
The race is about who can push out the most content and the best content. Who can innovate with design? Who can present a broad, united front across an ever-growing number of media channels? These are questions we have to figure out, and fast.
Additionally, we’re in a world where consumers have become increasingly aware and discerning about graphic design. When a popular company changes their logo, it becomes mainstream news, bringing everyday consumers in on the conversation about what makes good design.
With the higher demand for content, and a more discerning audience, how can in-house creative teams keep up with the demand to both work quickly and deliver quality content?
This situation puts in-house design teams in a pretty tough spot. In this post—the first in a three-part series—I will introduce a best practice and share three related tips to get the most from your in-house design team. Each post in the series will follow the same structural format.

The first practice: Fueling up
Your creative team is given the difficult task of being creative, original and inspiring on demand every single day. It’s essential that they’re able to turn on their creativity when it counts.
To do this, creative teams bring a level of practical science to the table. They’re trained on hierarchy, grids, typographic theory, best practices, and so on. But to find those truly creative “lightning in a bottle” solutions, your design team will need a full tank of ideas, concepts, jokes, random facts and insights to pull from. This tank is what puts creativity on tap, ready to go at a moment’s notice.
Here’s how you help them fill it.

Tip #1: Hone their craft
One of the biggest traps creatives can fall into is becoming complacent, using the same techniques and ideas over and over again. The world of design is rich and deep. One could spend a lifetime learning the ins and outs of all the different designers, movements and techniques, but the demands of work can stunt this learning.
Encourage your team to expand their knowledge base. This can be done through tutorial programs like Skillshare, Lynda or Udemy. On Netflix, there are many documentaries about design worth watching. There are also plenty of free tutorials and documentaries on YouTube. And even though it’s not a visual medium, podcasts can be a great source of inspiration. Finally, you could offer to purchase books about graphic design, so the designers have a small library on-hand to help bust through the occasional creative block.
Another way to help your design team develop new skills is to send them to conferences like Adobe Max, HOW Design, AIGA and Brand New. There, they can hear from key figures in the industry and mingle with their peers. They can keep a pulse on the state of the industry, and often, it is a much-needed morale and creativity boost.
If you don’t have the time or budget to send them to those bigger conferences, there are often local meet-ups that offer many of the same experiences. Check out Creative Mornings or your local AIGA chapter to get plugged in.

Tip #2: Break out of the design box
For design teams to stay sharp, they need various inputs channeling new information into their creative tanks. Keeping this tank full of fuel is essential to solving creative problems at a moment’s notice.
One way to help is by encouraging your team to stretch in ways not directly related to their day job. They could learn a new hobby, try out a new sport, or seek a new cultural experience. Push your team members to get out of their comfort zones. There are a million suggestions you could make: learn to rock climb, weld, or change a car’s oil. Adopt a dog. Listen to new kinds of music, travel to a new part of the world, volunteer at the local food bank. Read the collected works of an author, join a book club, take improv classes. The possibilities are, as they say, endless.
Here’s the catch. The creative tank requires a natural ebb and flow of work, rest, exploration and collection. You can’t get the best work out of your design team if they’re stuck staring at their computers all the time. This requires you, as the creative director, to limit the amount of time you’re demanding them to be in the office. Much of the creative field demands a huge commitment of time, late hours and constant connection. But the best work isn’t going to come from exhausting your team members—it comes from letting them momentarily step away from their ongoing tasks.

Tip #3: Connect with the customer
During my time here at Lucidpress, I’ve been able to attend various conferences with our sales team.
In 2017, I traveled to conferences with AIGA, HOW and Adobe. I sat in on a bunch of sessions, which was fantastic—a critical part of practicing my craft and learning new skills, right? But to be completely honest with you, the best learning experiences came from manning our booth and meeting potential customers.
As a creative director, sitting at my desk all day, I’m far-removed from the experience of our users. But after interacting with potential customers, answering questions, hearing their frustrations and connecting with them, I’m better able to inject empathy into my work. I’m more motivated to serve them, and I make better decisions by knowing where our customers are coming from.
Make sure to connect your creative team with your customers. Bring in a few clients for an interview session and lead a “design thinking” workshop. Include your design team in meetings with clients, and send your creative team out with your sales team when it makes sense. It will be immensely helpful for them to hear all the questions, complaints, praise and criticism first-hand. You’ll soon find that your team members are more invested and bring better solutions to the table.
Key takeaway
The first step towards getting more output from your creative team is to keep their tanks full. Don’t make the mistake of letting them run dry when there are so many opportunities to refuel.
The second practice: Streamline your process
All the creative fuel in the world isn’t going to help your team if you have a lot of inefficient drag that’s slowing them down. Drag isn’t unique; our research on design team processes shows that creative teams spend a significant amount of time doing mundane work and revisions.
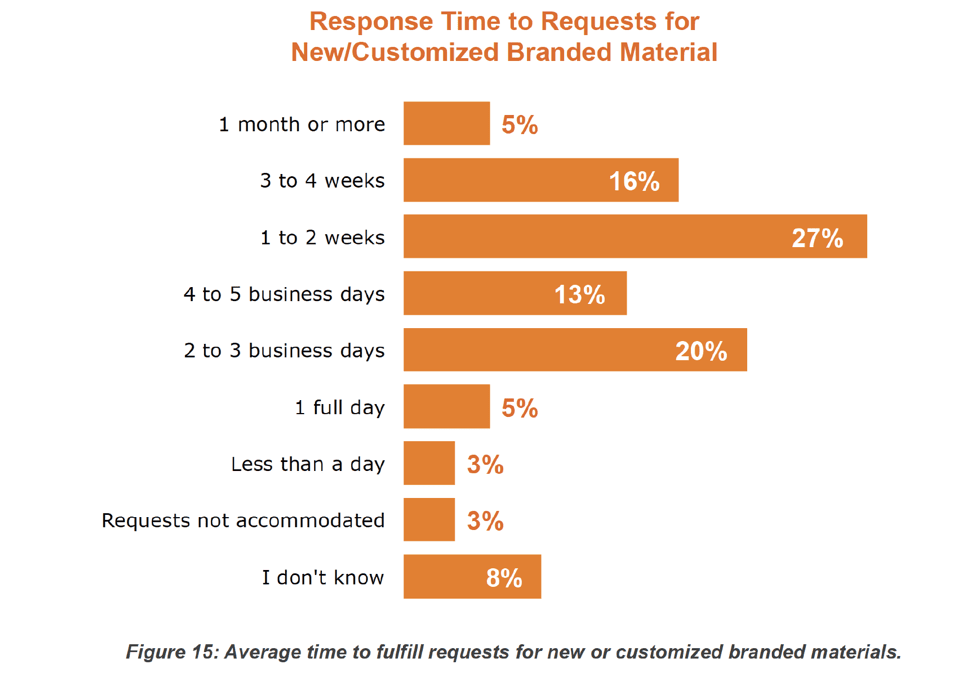
We’ve also found that for virtually half of the organizations we studied, the turnaround time needed to complete a request was at least one week, with 19% saying it would take 3 to 4 weeks or even longer. That’s crazy-in this design race, we have to move faster and be nimbler than that. So, what can we do?

Tip #1: Clear goals
As a creative director, your job is to make sure your team don’t start working on a project without clear goals that are well-defined. But clear goals can be surprisingly hard to narrow down. It takes having one vision and one voice. Give your team a single, clear objective to work towards. You can’t expect them to read your mind, or the mind of anyone else in the company. Be very explicit in what you are trying to accomplish.
Without clear goals on a project, the creative work will suffer. One of the most common errors marketers make is trying to pack too much information into a single piece of collateral or ad. It’s tempting to try hitting every selling point, feature and competitive advantage, but all the messages cannibalize each other-ultimately making the piece less effective. If you don’t have a clear goal, your design will be full of dense text boxes competing with each other for space on the page.
Even worse than cluttered design, without clear goals, there will be arguing and disagreements about the point of the project. And as you know, in this situation, creative teams will bear the brunt of endless revision cycles. Clear goals prevent this waste of time and talent.
To sum up, the best goals are short, punchy and narrowly focused.

Tip #2: Clear ownership
Any given project probably has a number of interested parties, and they’re usually more than happy to offer their input and thoughts. Some of these parties can be pretty demanding.
It’s up to you as the creative director to cut out all the different voices and determine the person who will have final approval, then focus on them. Others may have good ideas and valuable insights, but if they try to influence the decision-making process, they will only be in the way.
If clear approvals and ownership are not established, the design process can get bogged down-or worse, become a proxy power battle among different egos in the company. You’ll probably find some individuals pulling you aside or emailing you directly to make requests. Push back at those attempts. For the benefit of the creative team, and the company, there can only be one person who has final say.
Demand to know who that is before any work begins.
Tip #3: Clear creative brief
The creative brief is the next step after clear goals and clear ownership are established. We all know that creative briefs are essential, but often, they’re not implemented or are implemented poorly. The best creative brief is just that: brief. The worst is long and hastily thrown together, and no one considers it binding. Distilling all of the available information, competing goals and differing opinions into a succinct document is the magic that makes creative briefs powerful.
The distillation process forces everyone involved to really think through the project, to voice their opinions and make hard decisions. Any disagreements about the direction of a project should come up at this stage, before any design work starts.
At the end of the distillation process, the brief becomes a sort of contract. All parties involved should agree to the contents of the creative work, and all creative work should be compared to the brief. Is the creative work meeting the needs and goals outlined in the brief? If it is, great; if not, back to work.
For you and your design team, the brief becomes especially important if and when disagreements arise. Then, you can point to the text and say, “We are completing what was agreed upon in the brief.” It becomes a shield to protect your designers from being jerked around or wasting time. [![]() ]
]
So, if your account manager, sales team or marketing team gives you a bad creative brief, it’s your job to talk to them about how to make it better. It can be an awkward discussion, but in the end, a strong brief saves headaches, revision time and frustration.
Put the work in to make your briefs powerful. In the end, it’s the only sure way to cover your ass.
Key takeaway
Your creatives can be fueled up and ready to make great work, but without a streamlined process, they will soon burn out with frustration. It’s up to you to make sure they can work supported and unhindered.
Now, there’s one big thing we’re still missing. Even with those significant improvements, there’s still a snag-and that’s the inescapable fact that creative teams are a bottleneck.

How often has this happened to you: Your designer takes on a new project, she’s excited to get started, and, using a strong creative brief, she comes up with a good design solution.
She exports a PDF and emails it to the account manager for review.
The account manager has a few revisions and shoots an email back.
Your designer happily makes a few changes and sends it back for approval.
This time, the account manager sends it to other interested parties, and guess what-legal has some changes, the marketing manager has changes, and one of the partners has changes. Oh, and some of these changes conflict with one another.
Legal has printed out the document, written illegible notes in the margins, scanned it back in and emailed it to the designer. Now she has to sort through all the different changes, decipher legal’s notes, and try to harmonize the conflicting edits.
Meanwhile, new projects are queuing up, and your team member is feeling pressured to get this project out the door, stat.
Oops, now there’s miscommunication between legal and the partner, and the marketing manager feels miffed that his changes got lost in the mix. After nearly endless revisions, conversations and confusion, your creative is burned out and everyone’s feelings are raw.
This scenario plays out almost every day in the corporate world. The problem is that the design process repeatedly routes through a single person: the creative.
The big question here is how do we eliminate this bottleneck, take extra workload off the creative team, and make the entire process more efficient?
Integrate your design process
The answer starts by changing how we think about the role of creative teams in a company. We need a new design process: one that is more inclusive, efficient and smart. A silo-busting process that works across disciplines. One that recognizes the need for speed in today’s environment while keeping creative teams firmly in the creative driver’s seat. We need creative team members to break out of their isolated roles to better create, collaborate, and control their content.
Here are three tips to help your creative team break out of that deadly cycle of revisions.

Tip #1: Informed, collaborative, integrated design
We’ve already established that the best work comes from strong creative briefs that all interested parties agree with. Now, let’s take that one step further. Rather than the creative team being the only one who cares about design, what if everyone from the creative team to HR to legal and especially to the executive team were invested, educated and involved in the design process? I call this integrated design.
Integrated design means everyone in the company is:
- Educated on the brand’s standards
- Committed to enforcing compliance
- Prepared to participate in design revisions
Integrated design means the creative team can engage everyone involved in an effective, collaborative way, greatly reducing the amount of revision time.
To be clear, I’m not suggesting design by committee. Design by committee happens when people believe they have authority over the design process, or parts of the process that shouldn’t involve them. That’s the last thing your creative team needs. Instead, integrated design elevates the process into a business essential, putting creative team members in control so they’re no longer the bottleneck.
Host a short, smart training session to review the brand standards and why they matter. Show examples from competitors of how their branding is succeeding or failing. Paint the picture for your company that a strong brand is essential to success. Then, get commitment from everyone to help enforce brand standards. That way, your creative team will feel less pressure to constantly police everything your company puts out.
Show the best way for employees to give feedback. Do they need to be trained on certain software programs? Do they need to learn a little design vocabulary? Since you’ve established that strong branding and design are essential, everyone will be open to learning a new process.

Tip #2: Rev up your brand guidelines
To reduce the time design teams spend on recreating work, you need to set up strong brand guidelines. And by strong, I mean that they are thorough and easily accessible.
Branding isn’t just a set of colors and typefaces. It’s a system based on a company’s core values and traits. [![]() ] Pointing out the logical connections between company values and branding will strengthen employees’ commitment to using the brand guide.
] Pointing out the logical connections between company values and branding will strengthen employees’ commitment to using the brand guide.
Equally important as having strong guidelines is making sure they’re accessible. What good is a brand guide if no one can use it?
A PDF with your brand guidelines is a good start, but it’s limited because it has to be emailed back and forth, and, if it is ever updated, you run the risk of employees referencing old guidelines. An even better solution is to have a living brand guide. A living brand guide is a centralized, dynamic system that lets your creative team update the brand standards (which instantly updates them for everyone else).
One of the reasons I love Lucidpress is that it serves as a powerful living brand guide. It stores brand logos, colors, fonts and other assets, making it super easy for creative teams to set the standard and keep everyone on track.
Designers can set brand assets as the default settings for each new document in Lucidpress, making it super easy and convenient for employees to design with the right brand elements from the start. Since Lucidpress lives in the cloud, designers can make updates on the fly and sync them company-wide.

Tip #3: Do it once, do it right
One more story. How often do you have small, recurring design requests? For example, maybe your sales team needs a flyer updated every time they go to a convention. It’s a simple change, but for the creative team, the time adds up.
What if you need to make promotional materials for all of your franchise locations, and your creative team has to spend a ton of time simply switching out addresses and hours? This is a huge waste of time and talent. Your creative team should be focusing on delivering great creative work, not sorting through countless edit requests.
One solution is to give everyone in the company access to Publisher or InDesign… but then the creative team has no control over the brand standards. Plus, everyone will be sending files back and forth, managing their own fonts, and losing track of assets. Once again, your design team becomes the bottleneck.
The key to freeing them up is through cloud-based, lockable templates. Lockable templates empower employees other than creative team members to create and update branded content.
This is a special feature we’ve built for Lucidpress. Creative teams can make templates, then lock down the fonts and colors, the position of text boxes, logos and legal copy-whatever you don’t want others to change. Because it’s all cloud-based, creative teams can easily manage, update and find all the files different employees are working on. Anyone can customize the content to their needs without adding to the creative team’s workload.
This is a huge breakthrough in the design process, and our customers have enjoyed great success in real-life applications. An art director from Reinhart Realty told us this:
“Some agents didn’t feel it was necessary to include the Reinhart logo on their content. But now that we can lock down our brand assets on the templates, agents and brokers can’t accidentally mess things up.”
The results are pretty stunning. Both Reinhart admins and agents agreed that Lucidpress saves them about 2 hours of work per week. With 160 Reinhart employees using Lucidpress, that’s 320 hours of work saved per week-or 16,640 hours saved per year.
That is the real result of an integrated design process.
Wrapping up
As a creative director, your designers are one of your greatest assets. Focus on fueling them up, incorporating an integrated design process, and providing the tools to create great, on-brand materials. It’s the only way you can win this big design race we’re in.
The lure of the hip advertising agency is becoming outdated as more creatives move in house to meet the demands of nonstop content. In 2018, 78% of members of the Association of National Advertisers used some form of in-house agency services. This is up from 58% in 2013 and 42% in 2008 — so you can see where the trend is heading.
What qualifies as an “in-house agency”?
A lot of businesses have internal creative teams, but how is that different from an in-house creative agency? As you can imagine, an in-house agency is bigger in every capacity and more complex than a creative team.
Internal creative teams are often specific to a department, so different departments will have their own teams who all answer to a different manager (and this setup can lead to siloed creative work).
An in-house agency operates as its own department that the rest of the company turns to when any creative work is needed. It also has its own management structure.
In-house agencies differ from external agencies in a lot of ways, but the primary difference is that external agencies service a bunch of different companies and brands, while an in-house agency has only one client.
What are the benefits of an in-house creative agency?
Among the many benefits of having an internal creative agency, Digiday found that 75% of brand marketers think moving services in house improved speed and agility, and 68% say it reduced overhead.
When you keep things in house, you’re eliminating the middlemen, and the fewer people you need to relay information to, the faster your turnaround. Because of this, your projects are also less likely to suffer from the “telephone effect” where the message or outcome gets further and further skewed from its original intent.
But the biggest benefit? Your in-house agency is focused on only one thing: your brand. It’s going to be far more knowledgeable and more invested in your company than any external agency could be.
What are the challenges of an in-house creative agency?
According to a study from the In-House Agency Forum (IHAF), 78% of agencies report having a “clear mission, purpose and/or objective,” yet 42% of marketers report they don’t know what their agency’s mission is. Clearly, those numbers don’t quite add up.
On top of that, in-house agencies are often missing the specialized talent to get the job done. “Three in four IHAs (79%) say specialty talent and capabilities need to advance internally over the next two years, with video, digital, social media and analytics skills topping the list of what’s needed.”
Only 31% of corporate marketers saying IHA leadership is “highly” effective, and 53% think it’s just “somewhat” effective, showing room for improvement in leadership.
There are also challenges with scaling marketing efforts. Growing content needs and edit requests can overwhelm in-house creatives, especially if there’s not enough budget to hire more people.
Tips for building an effective internal agency
So how can you set up an in-house agency that thrives? Here are the basics:
Know your brand
This goes for pretty much any endeavor, but the more clearly you can define your brand, the clearer your mission will be and the better your agency will understand its goals.
Know what you need (and what you don’t)
Not every agency is going to need a team of videographers or savvy social media mavens. Do you want account executives? Producers? Media buyers? A PR team? Your agency can be as simple or complex as you need.
Expand where you need to and don’t skimp on the roles whose specialties will make great work possible. But save where you can by knowing what will and won’t give you return on your investment.
Hire the right people
Diversity is king — especially when you’re working in a creative field. To make your agency dynamic, you want to have people with different backgrounds and professional experiences.
You also want to invest in good leadership. The right leaders will steer your brand in the right direction and keep your staff happy.
Focus on a culture of creativity
Once you’ve got things in place, the work’s not over. Agency culture is extremely important, and you want to make sure your creatives feel like they have the freedom to pursue big ideas.
Encourage out-of-the-box thinking and risk-taking. It’s also beneficial to regularly give employees time to explore creative pursuits that are tangential to their roles.
Building a successful in-house creative agency will take vision and an inspired sense of leadership. For more tips on how to master creative leadership, check out our free guide How to manage creative teams, where you’ll find advice on advocating for and building a good rapport with your team, as well as info about leading with a creative vision.
A marketing brief is the blueprint that keeps your team aligned from the start of any marketing campaign, big or small. Unfortunately, these briefs don’t always feel like the superhero that makes your life easier, rather, they tend to feel like a complicated task that takes too long to put together.
But hey! It doesn’t have to be that way. It’s time to ditch the traditional document that can be too complicated. In order to get you to a more efficient starting point, we’re going to outline how to write a marketing brief like a champ so you can get the ball rolling on success.
Why you need a marketing brief
Marketing briefs give creative team members, along with stakeholders, a foundation for the marketing strategy for each and every project. They provide a hard outline of what everyone needs to know to carry out your campaigns for advertising, communications, websites, public relations, etc.
With the right things included in the brief, you’ll get down to the nitty-gritty, like the target audience and budget for any marketing campaign. With a good marketing campaign brief template, you can also clarify roles and objectives so everyone you work with on the campaign knows exactly what you want and how you want it done.
It’s important to note that a marketing brief is different from a creative brief. A good marketing brief example is as follows: it explains the purpose of a marketing strategy, identifies the goals and audience of the campaign, sets timelines, and establishes measurements for success. Essentially, it’s the instructions for the agency or team you’ll be working with.
A creative brief is a separate document used for campaigns or projects that require creative strategy. A creative team uses it to outline aesthetic elements and address any other problems through a creative strategy. A creative brief can include your target audience, correct logo use, brand colors, etc.
What to include in a marketing brief
To make things easier for yourself in the future, create a simple marketing brief template. We’ve outlined the most important things you should always include in a marketing brief below. There may be some projects that require more information than what we’ve included, but this outline will be a great starting point to build off of.
1. Goals and Objectives
Use this section to outline exactly what you want to achieve with the campaign or project: Increase brand awareness? Gain 10,000 new subscribers? Generate $20,000 in new online purchases? Be as specific as possible. This section is also a good spot to highlight any potential risks associated with the project.
2. Background
This section of your marketing campaign brief is meant to help team members understand the significance of the project. Providing background context for why the work is being requested will influence their decisions and help the project reach its goals.
3. Audience
In every marketing brief template, you’ll find a section with information on the audience or target market. This is one of the most important sections because it will explain exactly who you’re trying to reach. The more specific you can be, the better.
4. Deliverables
Clearly list out what finished products are expected to be included in the campaign. This may include ads, designs, logos, social media posts, landing pages, etc.
5. Channels
Where are the deliverables going to live and how will they be distributed? Outline which channels you’re currently using and if you want to experiment with new channels. This will be influenced by your target audience.
6. Timeline
No matter how big the project is, you need to outline the timeframe for work expected. Include hard and soft deadlines and whether they’ll fall within a quarter or particular sprint. Break down every step as much as possible. Remember to include when the campaign will launch and end.
7. Budget
Remember to outline your budget for the campaign. You can start with a range and then map out expenses once the full execution plan is decided on. You may either need to scale back or have some wiggle room when comparing your final budget to the initial range.
8. Tracking and Measurements
A marketing brief template would be useless if it didn’t include a section for tracking and measuring success. At the end of every campaign or project, be sure to collect any necessary data to determine if the campaign was a success, to measure marketing performance, and to see if your initial goals and objectives were met.
A marketing brief template that includes these eight sections will provide any potential agencies you work with the right background to put together a plan that can achieve your marketing goals. Overall, your marketing brief is meant to help define, plan and evaluate the overall campaign or project. When you think about it, it’s really just as simple as outlining what all stakeholders involved need to be doing, how they need to do it and when they need to do it by.
Check out our free marketing brief template for help getting started.